The Ultimate Guide to a Flawless Hardwood Flooring Installation
Are you ready to transform your space with the timeless beauty of hardwood flooring? Look no further! Welcome to the ultimate guide to a flawless hardwood flooring installation. Whether you’re a seasoned DIY enthusiast or a first-time homeowner, this comprehensive guide is designed to equip you with the knowledge and insights needed to achieve stunning results. From selecting the perfect hardwood species to preparing the subfloor, we’ll walk you through every step of the process. Discover the secrets of proper acclimation and learn how to measure, cut, and install hardwood planks like a pro. We’ll also delve into the world of finishing techniques, helping you choose the ideal sealant and providing tips for a smooth and durable finish. With our expert advice and practical tips, you’ll be able to create a warm and inviting atmosphere in your home that will stand the test of time. So, let’s get started and make your hardwood flooring dreams a reality!
Benefits of Hardwood Flooring
Hardwood flooring offers numerous benefits that make it a popular choice among homeowners. Its natural beauty, durability, and longevity are just a few reasons why hardwood flooring is highly sought after. With proper care, hardwood floors can last for decades, making them a smart investment for your home. Additionally, hardwood floors are easy to clean and maintain, providing a hygienic and allergen-free environment. Furthermore, hardwood flooring adds value to your property and enhances its overall aesthetic appeal. Whether you prefer a classic, rustic, or modern look, hardwood flooring offers a wide range of styles, colors, and finishes to suit your taste and complement your interior design.

Choosing the Right Hardwood Flooring Material
When it comes to choosing the right hardwood flooring material, there are several factors to consider. First, you’ll need to decide between solid hardwood and engineered hardwood. Solid hardwood is made from a single piece of wood and offers the most authentic and natural look. Engineered hardwood, on the other hand, consists of multiple layers of wood veneer and plywood, making it more resistant to moisture and temperature fluctuations. Next, you’ll need to select the perfect hardwood species for your home. Oak, maple, and walnut are popular choices due to their durability and versatility. Each hardwood species has its own unique grain pattern and color variations, allowing you to create a customized look that suits your style and preferences. Finally, consider the different finishes available, such as matte, satin, and glossy, to achieve the desired aesthetic for your hardwood flooring.
Preparing the Subfloor for Installation
Before you can begin installing hardwood flooring, it’s crucial to prepare the subfloor properly. The subfloor should be clean, dry, and level to ensure a seamless installation. Start by removing any existing flooring and inspecting the subfloor for any damage or unevenness. Repair or replace any damaged sections and use a leveling compound to address any uneven areas. Next, ensure that the subfloor is dry and free from moisture, as excessive moisture can cause the hardwood planks to warp or buckle over time. Use a moisture meter to test the subfloor’s moisture levels, and if necessary, install a moisture barrier to prevent moisture from seeping into the hardwood flooring. Taking the time to properly prepare the subfloor will help maximize the lifespan of your hardwood flooring and prevent any future issues.
Tools and Materials Needed for Hardwood Flooring Installation
To ensure a successful hardwood flooring installation, it’s essential to have the right tools and materials on hand. Here’s a list of the basic tools and materials you’ll need:
– Hardwood flooring planks
– Underlayment or moisture barrier
– Adhesive or flooring nails
– Tape measure
– Chalk line
– Circular saw or miter saw
– Flooring nailer or stapler
– Rubber mallet
– Tapping block
– Pry bar
– Level
– Safety glasses and gloves
– Hammer
– Utility knife
– Respirator or dust mask
– Broom and dustpan
– Vacuum cleaner
Having these tools and materials readily available will help streamline the installation process and ensure that you have everything you need to achieve a flawless result.

Hardwood Flooring Installation Methods – Nail-Down, Glue-Down, and Floating
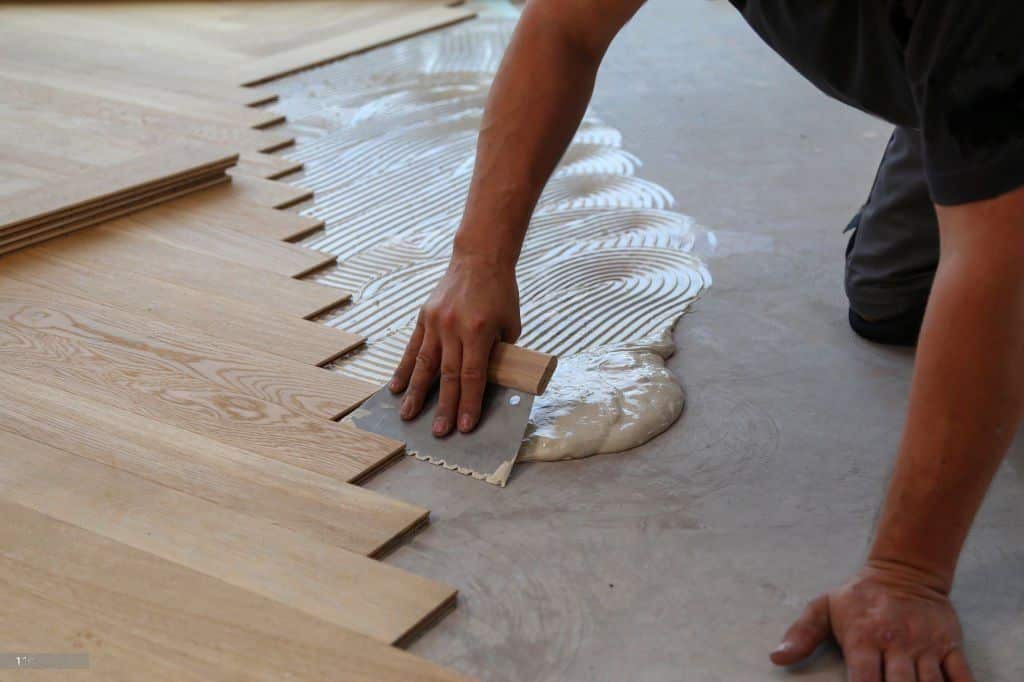
There are three primary methods of hardwood flooring installation: nail-down, glue-down, and floating. The method you choose will depend on various factors, including the type of hardwood flooring, the subfloor material, and your personal preferences. Nail-down installation involves attaching the hardwood planks to the subfloor using flooring nails or cleats. This method provides a secure and stable installation and is typically used for solid hardwood flooring. Glue-down installation, as the name suggests, involves adhering the hardwood planks directly to the subfloor using a high-quality adhesive. This method is commonly used for engineered hardwood flooring and provides excellent stability and durability. Floating installation, on the other hand, involves interlocking the hardwood planks without any attachment to the subfloor. This method is popular for engineered hardwood flooring and offers flexibility and ease of installation. Consider the pros and cons of each installation method to determine which one is best suited for your specific needs.
Step-by-step Guide to Hardwood Flooring Installation
Now that you have a solid understanding of the different installation methods, let’s dive into a step-by-step guide for hardwood flooring installation. Follow these instructions carefully for a flawless result:
1. Acclimate the hardwood flooring planks to the room’s temperature and humidity for at least 72 hours.
2. Remove the baseboards and prepare the room by removing any furniture, appliances, or obstacles.
3. Install the moisture barrier or underlayment, if required, following the manufacturer’s instructions.
4. Start the installation from the longest, straightest wall in the room.
5. Measure and mark the layout of the hardwood flooring, ensuring that you leave a small gap around the perimeter of the room for expansion.
6. Cut the first row of hardwood planks to the desired length, making sure to stagger the end joints for a more natural look.
7. Apply adhesive or use flooring nails to secure the first row of planks to the subfloor, ensuring they are aligned and level.
8. Install the subsequent rows of hardwood planks, using a tapping block and rubber mallet to ensure a tight and secure fit.
9. Continue installing the hardwood planks row by row, cutting and fitting each plank as necessary.
10. Leave a small gap between the hardwood flooring and any fixed objects, such as walls or cabinets, to allow for expansion.
11. Once all the planks are installed, reinstall the baseboards and trim to cover the expansion gap.
12. Clean the hardwood flooring thoroughly, removing any dust or debris.
13. Apply the desired finish or sealant to protect the hardwood flooring and enhance its appearance.
14. Allow the finish to dry completely before moving any furniture or walking on the newly installed hardwood flooring.
Following these steps will ensure a smooth and successful hardwood flooring installation that you can be proud of.
Tips for a Flawless Hardwood Flooring Installation
In addition to following the step-by-step guide, here are some valuable tips to help you achieve a flawless hardwood flooring installation:
1. Take accurate measurements and plan the layout of the hardwood flooring before beginning the installation.
2. Use a high-quality adhesive or flooring nails to ensure a secure and long-lasting installation.
3. Take your time during the installation process, ensuring that each plank is properly aligned and level.
4. Use a tapping block and rubber mallet to gently tap the planks into place, avoiding excessive force that could damage the wood.
5. Keep the expansion gap around the perimeter of the room consistent to allow for proper expansion and contraction of the hardwood flooring.
6. Clean the hardwood flooring regularly using a soft broom or vacuum cleaner to remove dirt and debris.
7. Avoid excessive moisture on the hardwood flooring, as it can cause warping or damage over time.
8. Place protective pads under furniture legs to prevent scratching or denting the hardwood flooring.
9. Use floor mats at entryways to minimize dirt and moisture being tracked onto the hardwood flooring.
10. Follow the manufacturer’s instructions for maintenance and care to preserve the beauty and longevity of your hardwood flooring.
By following these tips, you’ll be able to achieve a flawless hardwood flooring installation that will enhance the beauty and value of your home for years to come.

Maintenance and Care for Hardwood Flooring
Proper maintenance and care are essential to prolonging the lifespan of your hardwood flooring and keeping it looking its best. Here are some maintenance tips to keep in mind:
– Clean spills immediately to prevent moisture from seeping into the wood.
– Use a damp mop or hardwood floor cleaner specifically designed for wood flooring to clean the surface regularly.
– Avoid using harsh chemicals or abrasive cleaners that could damage the finish.
– Place felt pads under furniture legs to prevent scratches and dents.
– Trim pet nails regularly to minimize the risk of scratches.
– Use rugs or mats in high-traffic areas to reduce wear and tear.
– Protect the hardwood flooring from direct sunlight to prevent fading or discoloration.
– Avoid dragging heavy furniture or sharp objects across the hardwood flooring.
– Periodically check for signs of wear or damage and address any issues promptly.
By following these maintenance practices, you’ll be able to enjoy your hardwood flooring for many years to come, maintaining its beauty and durability.
Frequently Asked Questions About Hardwood Flooring Installation
1. Can I install hardwood flooring over a concrete subfloor?
Yes, you can install hardwood flooring over a concrete subfloor by using a moisture barrier and adhesive or by using an engineered hardwood flooring specifically designed for concrete subfloors.
2. How long does it take to install hardwood flooring?
The time it takes to install hardwood flooring depends on various factors, such as the size of the room, the installation method, and your level of expertise. On average, it can take anywhere from a few days to a week to complete the installation.
3. Can I install hardwood flooring myself, or should I hire a professional?
If you have experience with DIY projects and feel confident in your abilities, you can install hardwood flooring yourself. However, if you’re unsure or don’t have the necessary skills, it’s best to hire a professional to ensure a flawless installation.
4. How do I choose the right finish for my hardwood flooring?
Choosing the right finish for your hardwood flooring depends on your personal preferences and the desired look you want to achieve. Matte finishes offer a more natural and rustic look, while glossy finishes provide a more polished and contemporary appearance. Consider the level of durability and maintenance required for each finish as well.
5. How often do I need to refinish my hardwood flooring?
The frequency of refinishing your hardwood flooring depends on various factors, such as the amount of foot traffic, the type of finish, and the overall condition of the hardwood. On average, hardwood flooring should be refinished every 7 to 10 years to maintain its appearance and protect it from wear and tear.
These are just a few frequently asked questions about hardwood flooring installation. If you have any specific queries or concerns, it’s best to consult with a flooring professional for expert advice.

Conclusion
Congratulations! You’ve now reached the end of the ultimate guide to a flawless hardwood flooring installation. We’ve covered the benefits of hardwood flooring, how to choose the right material, preparing the subfloor, installation methods, step-by-step instructions, tips for a flawless installation, maintenance and care, and frequently asked questions. By following these guidelines and using our expert advice, you’ll be well-equipped to embark on your hardwood flooring installation journey. Whether you’re looking to add warmth and elegance to your living room, bedroom, or any other space in your home, hardwood flooring is a timeless choice that will never go out of style. So, go ahead and make your hardwood flooring dreams a reality – your home deserves nothing less than the best!


