
How is Vinyl Flooring Installed:
Vinyl flooring has become a popular choice for homeowners and commercial spaces due to its durability, versatility, and affordability. Whether you’re renovating your home or designing a new space, understanding how vinyl flooring is installed is essential to ensure a long-lasting, attractive, and functional floor. In this comprehensive guide, we’ll walk you through the process of vinyl flooring installation, providing step-by-step instructions, expert tips, and answers to common questions.
A Brief History of Vinyl Flooring
Before we dive into the installation process, let’s take a moment to explore the history of vinyl flooring. Vinyl flooring has its roots in the mid-20th century when it was introduced as an affordable alternative to traditional hardwood and tile flooring. Over the years, vinyl flooring has evolved, offering a wide range of styles, patterns, and textures. Today, it has become a top choice for both residential and commercial applications due to its durability and low maintenance requirements, how is vinyl flooring installed, Request your free estimate

Step-by-Step: How is Vinyl Flooring Installed
- Step 1: Gather Your Materials
Before you begin the installation process, it’s crucial to gather all the necessary materials and tools. These typically include vinyl flooring planks or sheets, adhesive, a utility knife, a measuring tape, a straightedge, a roller, and safety equipment. how is vinyl flooring installed
- Step 2: Prepare the Subfloor
A well-prepared subfloor is the foundation of a successful vinyl flooring installation. Ensure that the subfloor is clean, level, and free of any debris or imperfections. If necessary, use a self-leveling compound to even out any irregularities.
- Step 3: Acclimate the Vinyl Flooring
Vinyl flooring can expand or contract with changes in temperature and humidity, so it’s essential to acclimate it to the room’s conditions. Allow the flooring to sit in the room for at least 24 hours before installation.
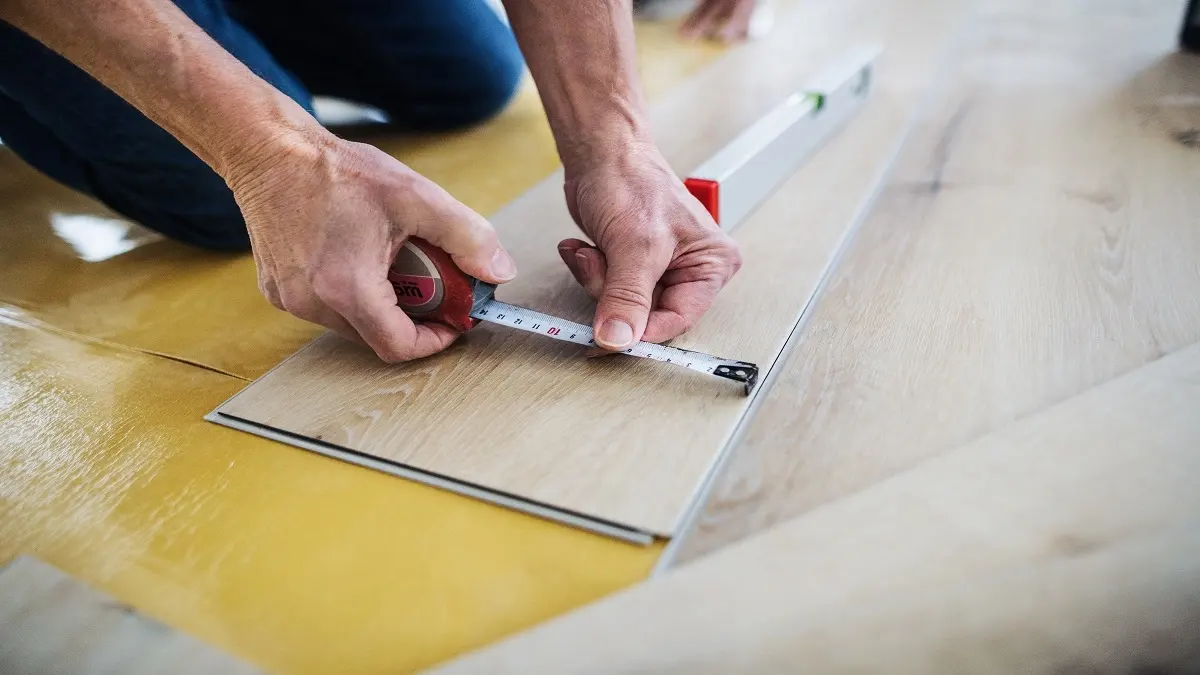
- Step 4: Measure and Cut
Measure the dimensions of the room and cut the vinyl flooring planks or sheets to fit. Use a sharp utility knife and a straightedge to make precise cuts.
- Step 5: Apply Adhesive
Depending on the type of vinyl flooring you have, apply the appropriate adhesive to the subfloor. Follow the manufacturer’s instructions for the adhesive application.
- Step 6: Install the Vinyl Flooring
Carefully lay the vinyl flooring planks or sheets onto the adhesive, starting from one corner of the room. Press the flooring down firmly to ensure a secure bond. Use a roller to eliminate any air bubbles or wrinkles.
- Step 7: Trim and Finish
Trim any excess vinyl along the edges of the room using the utility knife. Install baseboards or trim to cover the edges and provide a finished look.
- Step 8: Allow for Expansion Gaps
Vinyl flooring needs room to expand and contract, so be sure to leave expansion gaps around the perimeter of the room. These gaps will be covered by baseboards or molding.
- Step 9: Clean and Maintain
Once the vinyl flooring is installed, clean it thoroughly to remove any adhesive residue or debris. Follow a regular maintenance routine to keep your vinyl flooring looking its best.
- Step 10: Enjoy Your New Vinyl Flooring
With the installation complete, you can now enjoy the benefits of your beautiful and durable vinyl flooring. It’s easy to clean, resistant to moisture, and designed to last for many years.

Common Questions About Vinyl Flooring Installation
- Q1: Can I install vinyl flooring over an existing floor?
Yes, in many cases, you can install vinyl flooring over an existing floor, as long as the surface is clean, level, and in good condition. However, it’s essential to consult the manufacturer’s guidelines and consider the type of subfloor and existing flooring material.
- Q2: Is professional installation necessary?
While DIY installation is possible for vinyl flooring, professional installation is recommended for complex patterns, commercial spaces, or if you lack experience. Professionals ensure proper adhesive application, seam sealing, and overall quality.
- Q3: How do I repair vinyl flooring if it gets damaged?
Vinyl flooring is relatively easy to repair. Small scratches or tears can be patched with a vinyl repair kit, while larger damage may require replacing individual planks or sheets. Always follow the manufacturer’s guidelines for repairs.
Conclusion:
In this extensive guide, we’ve covered the installation of vinyl flooring in ten detailed steps, from preparation to finishing touches. Understanding the process and following the recommended guidelines will result in a beautiful and long-lasting floor. We hope this article has been informative and helpful in your flooring project.
If you have any questions or would like to share your experiences with vinyl flooring installation, please leave a comment below. Your feedback and suggestions are valuable to us as we strive to provide the best information to our readers. Enjoy your new vinyl flooring!